Liquidity Heatmap Matrix [MTF] - PhenLabs📊Liquidity Heatmap Matrix
Version: PineScript™v6
📌Description
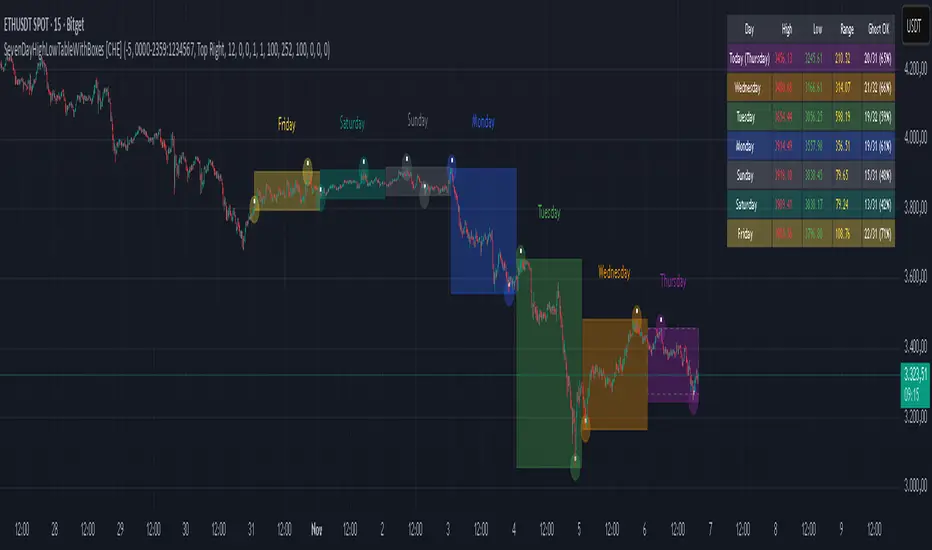
The Liquidity Heatmap Matrix is a multi-timeframe liquidity detection and visualization tool built to identify where equal highs and equal lows are forming across up to five configurable timeframes. It solves a core challenge for smart money and ICT-style traders: knowing exactly where stop-loss clusters and liquidity pools are building — before price sweeps them.
Rather than manually scanning multiple timeframes for double tops and bottoms, this indicator automates the entire process and presents confluence-weighted liquidity zones as a heatmap overlay directly on your chart. Levels confirmed by more timeframes glow with greater intensity, giving you an immediate sense of which zones carry the highest probability of a liquidity grab.
When price sweeps through a detected level, the indicator confirms it in real time with on-chart labels, color changes, and optional alerts — turning reactive analysis into proactive trade planning.
🚀Points of Innovation
● First-of-its-kind heatmap approach that scores liquidity zones on a 1-to-5 confluence scale across independent timeframes
● Automatic merging of nearby equal levels using a percentage-based tolerance system, eliminating duplicate zone clutter
● Real-time sweep confirmation engine that detects when price pierces a level and closes back inside, validating the liquidity grab
● Dynamic zone coloring that shifts from transparent to fully opaque as more timeframes confirm the same price level
● Built-in dashboard that ranks all active levels by confluence strength and tracks bullish versus bearish sweep counts
● Comprehensive alert suite covering new equal high/low formation and sweep events for both directions
🔧Core Components
● Multi-Timeframe Pivot Engine: Runs pivot high/low detection independently on each of the five timeframes using request.security calls, then feeds results into a unified level registry
● Equal Level Comparator: Compares each new pivot against a rolling window of recent pivots using a configurable percentage tolerance to identify price levels that have been tested more than once
● Confluence Merger: When the same price level appears on multiple timeframes, the system merges them into a single zone and increments the confluence score rather than stacking overlapping boxes
● Sweep Detection Module: Monitors all active levels bar-by-bar, confirming a sweep when price breaches the zone edge and then closes back within it — filtering out false breakouts
● Heatmap Renderer: Translates each level’s confluence score into a color intensity gradient, with separate palettes for equal highs (red spectrum) and equal lows (green spectrum)
● Dashboard Table: Displays every active level in a sortable table with type, price, per-timeframe dot indicators, confluence rating, and sweep status
🔥Key Features
● Supports 5 fully independent timeframes that can be toggled on or off and set to any interval from 1 minute to Monthly
● Heatmap coloring intensity scales automatically with confluence count — single-timeframe levels appear faint while 5-TF levels are fully saturated
● Sweep labels display the direction, confluence count, confirming timeframes, and exact price of each swept level directly on the chart
● Dashboard tracks all active equal high and equal low levels sorted by confluence descending with real-time bull and bear sweep counters
● Four alert conditions cover new equal highs, new equal lows, bearish sweeps (EQH taken), and bullish sweeps (EQL taken)
● Swept zones automatically change to a distinct highlight color and freeze their right edge at the sweep bar for clear historical reference
● Old swept levels are cleaned up after 100 bars and stale unswept levels expire after 500 bars to keep the chart uncluttered
● All zone colors, widths, extension lengths, and dashboard positioning are fully customizable
🎨Visualization
● Liquidity Zone Boxes: Colored rectangles overlaid on the chart representing each equal high or equal low level — red-spectrum for EQH, green-spectrum for EQL, with opacity increasing as confluence rises
● Heatmap Intensity Gradient: Single-TF zones appear nearly transparent while 5-TF zones are fully opaque, creating a visual heat signature of where liquidity is densest
● Sweep Labels: Appear at the sweep bar with directional arrows (🔻 for EQH swept, 🔺 for EQL swept), showing confluence count, confirming timeframe list, and price
● Swept Zone Highlight: Confirmed sweeps turn the zone box to a yellow highlight color, clearly distinguishing consumed liquidity from active levels
● Dashboard Table: A compact on-chart table (repositionable to any corner) showing Type, Price, per-TF active dots (● / ○), and confluence rating for every tracked level
● Summary Footer: Bottom row of the dashboard displays total bullish sweeps, bearish sweeps, and combined sweep count
📖Usage Guidelines
● TF 1 through TF 5 Enabled — Toggle each timeframe on or off (Default: TF1 and TF2 enabled, TF3-TF5 disabled)
● TF 1 through TF 5 Interval — Set each timeframe independently (Defaults: 5m, 15m, 1H, 4H, Daily)
● Pivot Lookback Left — Number of bars to the left for pivot detection (Default: 6, Range: 1–50)
● Pivot Lookback Right — Number of bars to the right for pivot confirmation (Default: 6, Range: 1–50)
● Equal Level Tolerance (%) — Maximum percentage difference for two pivots to be considered equal (Default: 0.1%, Range: 0.01–2.0%)
● Max Pivots to Compare — Rolling window size of recent pivots checked for equal levels (Default: 5, Range: 2–10)
● Max Active Levels — Maximum number of liquidity zones tracked simultaneously (Default: 20, Range: 5–50)
● Sweep Confirm Bars — Bars to wait before confirming a sweep after price pierces a level (Default: 2, Range: 1–10)
● Show Liquidity Zones — Toggle zone box rendering on or off (Default: On)
● Show Sweep Labels — Toggle sweep confirmation labels on or off (Default: On)
● Show Dashboard — Toggle the summary dashboard table on or off (Default: On)
● Zone Width (%) — Percentage-based half-width of each liquidity zone box (Default: 0.05%, Range: 0.01–1.0%)
● Zone Extend (bars) — How far forward active zone boxes extend on the chart (Default: 50, Range: 10–200)
● Dashboard Position — Corner placement of the dashboard table (Options: Top Right, Bottom Right, Top Left, Bottom Left)
● EQH Colors — Customizable color range from 1-TF to 5-TF confluence for equal high zones (Default: Red spectrum with varying transparency)
● EQL Colors — Customizable color range from 1-TF to 5-TF confluence for equal low zones (Default: Green spectrum with varying transparency)
● Swept Zone Color — Highlight color for levels that have been confirmed swept (Default: Yellow at 30% transparency)
✅Best Use Cases
● Identifying high-probability reversal zones where liquidity has clustered across multiple timeframes before entering a mean-reversion trade
● Pre-planning take-profit targets by locating where dense liquidity pools sit above or below current price
● Filtering breakout trades by checking whether price is approaching a high-confluence liquidity zone likely to cause a sweep and reversal
● Confirming ICT and smart money concepts by visualizing where equal highs and equal lows form as institutional liquidity targets
● Setting up sweep-based alerts to get notified the moment a multi-TF liquidity level gets taken, enabling rapid reaction entries
● Using the dashboard as a real-time liquidity scoreboard during active trading sessions to track which levels remain live and which have been consumed
⚠️Limitations
● Pivot detection requires a right-side lookback, so level identification has an inherent delay equal to the Pivot Lookback Right setting
● Very low tolerance values on volatile assets may produce few matches, while very high values may create false confluences — tuning to the asset’s typical spread is recommended
● The indicator tracks up to the Max Active Levels limit, so on extremely active charts some older unswept levels may be pruned before they are reached
● Multi-timeframe security calls can increase chart loading time, especially when all five timeframes are enabled on lower-timeframe charts
● Sweep detection relies on close price returning inside the zone — wicks that pierce and immediately reverse on the same bar without closing inside may not be captured
● This tool identifies liquidity zones and sweeps but does not generate buy or sell signals — it is designed to complement your existing strategy, not replace it
💡What Makes This Unique
● Confluence-weighted heatmap visualization is a fundamentally different approach to liquidity mapping compared to simple equal-high/low markers, providing probabilistic weight to each level
● The automatic cross-timeframe merging system eliminates zone stacking and clutter that plagues most multi-timeframe indicators
● Real-time sweep confirmation with multi-bar validation filters out noise and false breakouts that single-bar detection methods frequently flag
● The integrated dashboard provides a full-spectrum situational awareness panel without needing to switch between timeframes or use multiple indicators
🔬How It Works
● Step 1 — Pivot Detection: On each enabled timeframe, the script independently identifies pivot highs and pivot lows using a configurable left/right lookback window via ta.pivothigh and ta.pivotlow functions
● Step 2 — Equal Level Matching: Each new pivot is compared against a rolling buffer of recent pivots on the same timeframe; if two pivots fall within the percentage tolerance, an equal high or equal low is flagged
● Step 3 — Cross-Timeframe Registration and Merging: Detected equal levels are registered into a central level array; if a level from one timeframe falls near an existing level, it merges by incrementing the confluence score rather than creating a duplicate
● Step 4 — Heatmap Rendering: Each active level is drawn as a zone box with color intensity mapped to its confluence score using a 5-tier gradient — more confirming timeframes produce more visually prominent zones
● Step 5 — Sweep Monitoring: Every bar, the script checks whether price has breached a zone edge and closed back inside, confirming a liquidity sweep; confirmed sweeps update the zone color, freeze the box, and generate labels and alerts
● Step 6 — Lifecycle Management: Swept levels are retained for 100 bars for historical reference then removed; unswept levels older than 500 bars are pruned to maintain chart performance and visual clarity
💡Note:
For best results, start with the default settings and adjust tolerance and pivot lookback values to match the volatility profile of your specific asset. Lower timeframe combinations (e.g., 5m + 15m) are ideal for intraday scalping, while higher timeframe setups (e.g., 1H + 4H + Daily) suit swing trading. This indicator is designed as a confluence tool — combine it with your existing strategy, order flow analysis, or market structure methodology for highest-probability trade setups. It does not produce buy or sell signals on its own.
Pine Script® indicator